

Hey Loves,
Today I want to talk about flat lay photography. Flay lay photography is the "new black" the "IT" trend in photography that you see all over social media right now.
[bctt tweet="Flay lay photography is the IT trend in photography all over social media" username="natoyaammon"]
If you are just starting out like I am, your untrained eye might naively think that flat lay photography is easy to do, but boy let me tell you it's a photography technique that takes practice and time to be able to get it right. With a little effort, planning and practice, in time you too can become a pro and slay your own flat lay photographs!
"Flay lay photography is the "new black" the "IT" trend in photography that you see all over social media"
Like everything I do (blessing and curse) I research the hell out of it first before diving in. I've scoured the internet and found some helpful tips to keep in mind, that can make taking flay lay photos a bit easier for us newbies.
 So let's start with the BASICS.
 1.CAMERA
Now a days you have so many different camera options to choose from for your photography. It is not necessary to go out and break the back getting the most expensive camera on the market if you can't afford it. Make do with what you have. It's not the equipment it's how you use it. You can use a point and shoot camera, DSLR or even your smart phone. All of them can give you great results.
2.NATURAL LIGHT
Natural light is your bestie for most photo situations. Get as close to your natural light source as possible. This will help you get a clear photo that highlights the details. Find the best time of day to take photos. I find earlier in the morning up until 1 or 2pm works best for me. The color of the light is the bluest. After 2p the light starts to change color and direction. Chasing light is so annoying so I try to shoot when the light is the brightest and most consistent. Try to also eliminate as many shadows as possible.
3. SET UP
So where do you set up a flat lay photo? You can use the floor, a table, a chair or any flat straight surface. You read that right, a Flat Straight Surface. The first flay lay I ever tried to do I did on a desk that had a slight slant to it. I didn't take into consideration it was slanted forward, so when I put things like lipstick and mascara on it, it kept sliding off. A flat and straight surface is your best friend.
4. ANGLES
Angles can be tricky. But this technique will be conquered with practice and patience. To get the right angle for your photo you have to move around your subject and take many pictures to see what works. The key to angles for this type of photo is to not be too far away from your subject or too close. If you are too far you might lose the focus of the photo and too close may make the the objects in the picture appear too large and cut off portions of the photo.
A helpful tool for getting the right angle on a iPhone or DSLR camera is the grid feature that will help you match up the lines, see what's in your frame and ensure everything is straight.
5. ARRANGEMENT
Try arranging the objects in your photos in various different ways until you find the arrangement that works the best. Sometimes the way you picture the arrangement in your head doesn't quite work when laid out. Try to create a balance in your picture of big to small, bright bold colors to muted tones, simple to busier items.
Rebecca from the blog From Roses says there are a few styling considerations that you should consider before actually taking your flat lay photo.
1.CAMERA
Now a days you have so many different camera options to choose from for your photography. It is not necessary to go out and break the back getting the most expensive camera on the market if you can't afford it. Make do with what you have. It's not the equipment it's how you use it. You can use a point and shoot camera, DSLR or even your smart phone. All of them can give you great results.
2.NATURAL LIGHT
Natural light is your bestie for most photo situations. Get as close to your natural light source as possible. This will help you get a clear photo that highlights the details. Find the best time of day to take photos. I find earlier in the morning up until 1 or 2pm works best for me. The color of the light is the bluest. After 2p the light starts to change color and direction. Chasing light is so annoying so I try to shoot when the light is the brightest and most consistent. Try to also eliminate as many shadows as possible.
3. SET UP
So where do you set up a flat lay photo? You can use the floor, a table, a chair or any flat straight surface. You read that right, a Flat Straight Surface. The first flay lay I ever tried to do I did on a desk that had a slight slant to it. I didn't take into consideration it was slanted forward, so when I put things like lipstick and mascara on it, it kept sliding off. A flat and straight surface is your best friend.
4. ANGLES
Angles can be tricky. But this technique will be conquered with practice and patience. To get the right angle for your photo you have to move around your subject and take many pictures to see what works. The key to angles for this type of photo is to not be too far away from your subject or too close. If you are too far you might lose the focus of the photo and too close may make the the objects in the picture appear too large and cut off portions of the photo.
A helpful tool for getting the right angle on a iPhone or DSLR camera is the grid feature that will help you match up the lines, see what's in your frame and ensure everything is straight.
5. ARRANGEMENT
Try arranging the objects in your photos in various different ways until you find the arrangement that works the best. Sometimes the way you picture the arrangement in your head doesn't quite work when laid out. Try to create a balance in your picture of big to small, bright bold colors to muted tones, simple to busier items.
Rebecca from the blog From Roses says there are a few styling considerations that you should consider before actually taking your flat lay photo.
So let's start with the BASICS.
WHAT IS FLAT LAY PHOTOGRAPHY?
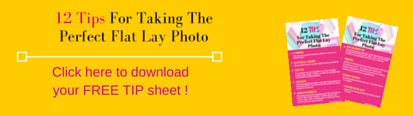
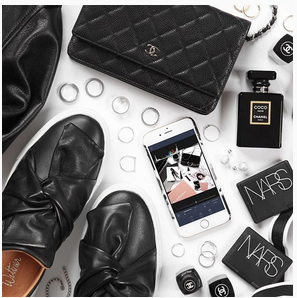
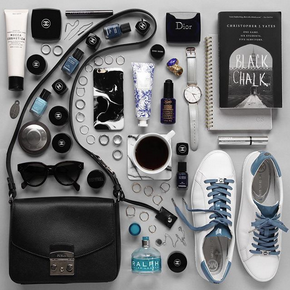
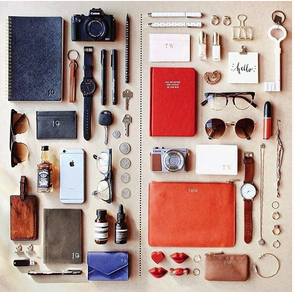
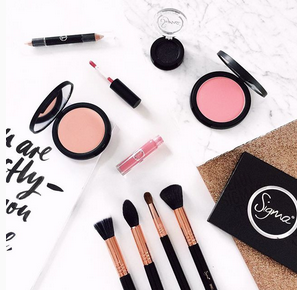
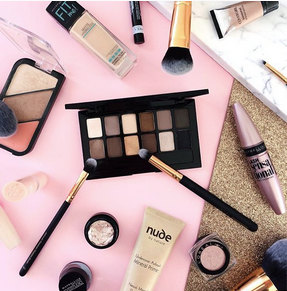
If your not familiar with the term "flat lay" photography I'll explain what it is. A flat lay photo is a picture that is taken directly over the subject that is being photographed. The subject(s) are usually products or food. Flat lay photos usually contain a theme and color schemes like a variation of pinks or blues or greens or warm or cool tones to even all black on white. Flat lays have similar items or props that are grouped together. If the flat lay was beauty related it would have similar items like lipsticks, blushes, eye shadows, mascaras, brushes and other makeup tools in the photograph. [bctt tweet="Flat lays are similar items or props that are grouped together" username="natoyaammon"] If the flat lay was food related, it might have items like cooking utensils, recipe ingredients, drinks and the main dish of course. Here are some tips for taking the perfect flat lay phot0! I've also created a handy list that you can download below, so you can remember all the tips. Click the yellow button here.
1.CAMERA
Now a days you have so many different camera options to choose from for your photography. It is not necessary to go out and break the back getting the most expensive camera on the market if you can't afford it. Make do with what you have. It's not the equipment it's how you use it. You can use a point and shoot camera, DSLR or even your smart phone. All of them can give you great results.
2.NATURAL LIGHT
Natural light is your bestie for most photo situations. Get as close to your natural light source as possible. This will help you get a clear photo that highlights the details. Find the best time of day to take photos. I find earlier in the morning up until 1 or 2pm works best for me. The color of the light is the bluest. After 2p the light starts to change color and direction. Chasing light is so annoying so I try to shoot when the light is the brightest and most consistent. Try to also eliminate as many shadows as possible.
3. SET UP
So where do you set up a flat lay photo? You can use the floor, a table, a chair or any flat straight surface. You read that right, a Flat Straight Surface. The first flay lay I ever tried to do I did on a desk that had a slight slant to it. I didn't take into consideration it was slanted forward, so when I put things like lipstick and mascara on it, it kept sliding off. A flat and straight surface is your best friend.
4. ANGLES
Angles can be tricky. But this technique will be conquered with practice and patience. To get the right angle for your photo you have to move around your subject and take many pictures to see what works. The key to angles for this type of photo is to not be too far away from your subject or too close. If you are too far you might lose the focus of the photo and too close may make the the objects in the picture appear too large and cut off portions of the photo.
A helpful tool for getting the right angle on a iPhone or DSLR camera is the grid feature that will help you match up the lines, see what's in your frame and ensure everything is straight.
5. ARRANGEMENT
Try arranging the objects in your photos in various different ways until you find the arrangement that works the best. Sometimes the way you picture the arrangement in your head doesn't quite work when laid out. Try to create a balance in your picture of big to small, bright bold colors to muted tones, simple to busier items.
Rebecca from the blog From Roses says there are a few styling considerations that you should consider before actually taking your flat lay photo.
Is there enough space in the image for everything to have breathing room?
If the items are arranged in a line are they straight?
Is the image looking too heavy in any areas?
How do the items look next to each other?
Is it too messy?
Do the props work?
Are the colors complimenting each other?
6. BACKGROUND
My eye seems to be drawn to plain backgrounds colored or white. A plain background works best because a bold background will over power the items you are trying to feature. Try using solid white backgrounds like white foam board, real or faux marble, wooden floors, bed covers, tiles, furs, colored paper or fabrics to add subtle texture to your photos.
7. PROPS
Use props! I love adding props. Adding various items to your flat lay photo will bring the picture to life giving your photo a bit more personality. I try to source out items that are cheap and easy to find. Michael's and the dollar store are my best friends for these kinds of things. You can also look for items that you have around the house. Free items are the best items! Use things like vases, jars, flowers, stationary, candles, pens/pencils, brushes, makeup, food, jewellery, magazine etc. Just remember to give the objects you place in your photo room to breathe this way they are all not crammed together looking like a hot mess. In my next post I will list prop ideas that can be used in your flay lay photography so look out for that.
8. STEADY HANDS
Try to take the steadiest picture you can. Nobody wants to hurt their eyes looking at your blurry picture. The best tool to use is a tripod. If you don't have a tripod yet you can definitely free style it by holding the camera yourself, just make sure to hold your breath when you take the photo. You need to be as still as possible to get a clear and steady shot.
9. KEEP ITEMS IN PLACE
You will need to keep certain items from rolling around and driving you crazy like lipsticks or brushes etc. Tack them down with double sided tape or Blu Tack or try balancing them on any small object that you can find like a pebble or bobby pin.
10. SQUARE FORMAT
If you’re uploading your flat lay photo to Instagram remember it has to be a square format photo. If you have an iPhone, select the Square option. Make sure the most important items to your picture are closer to the center of the picture so they don't get cut off especially if you take the picture in a wider format. If you haven't shot your photo in square more don't worry you can download the free Whitagram or Instasize apps, they add a white border to your rectangular photo to make it square. Cropping is another option as well.
11. PRACTICE, PRACTICE, PRACTICE
Like everything you want to get good at, PRACTICE is the key. The more you do it, the better you will become. Nobody is born a pro at taking pictures. Even the best photographers will tell you that they practiced and practiced to be able to get it right and find their style. Play around and take many flat lay pictures as often as you can to find your own groove and what you like. Practice will help give you get a better understanding of what works in an image and what doesn't work.
12. FIND INSPIRATION
Do some research and search for other people doing flat lay photography. How do they lay out their items? Can you tell what the main focus of the picture? What do you like about their style of flat lay photography? What style of flat lay photography do you like best? Beauty, Life style, Food? Search for hashtags on social media sites like Instagram and see what comes up. Here are a few hashtags to get you started #flaylays #flatlays_love #flatlayssquad You can also get lots of creative ideas by looking at other peoples account online. Remember don't copy them just get inspired by them.
Here are some accounts doing amazing flat lays that you can use as inspiration:
@designbyaikonik
@violettinder
@flipandstyle
@thepaperbunny
@cupofcouple
@haima_si
@paula13t (of Thirteen Thoughts)
@abeautifulmess
Courtesy of @thepaperbunny

 Courtesy of @flipandstyle
Courtesy of @designbyaikonik
Courtesy of @flipandstyle
I hope these tips have been super helpful. Now you and I both have the knowledge to slay our next flat lay photo!
Don't forget to download your handy tips list. Click the yellow button below.
Do you have any flat lay photography tips? If so, pop them down in the comments below!
BTW, If you aren’t following me on Instagram click here @natoyaammon to follow me!

Follow my blog with Bloglovin


2 Comments on 12 Tips For Taking The Perfect Flat Lay Photo
Great post Toya!
Thanks so much Jackie glad you liked it!!